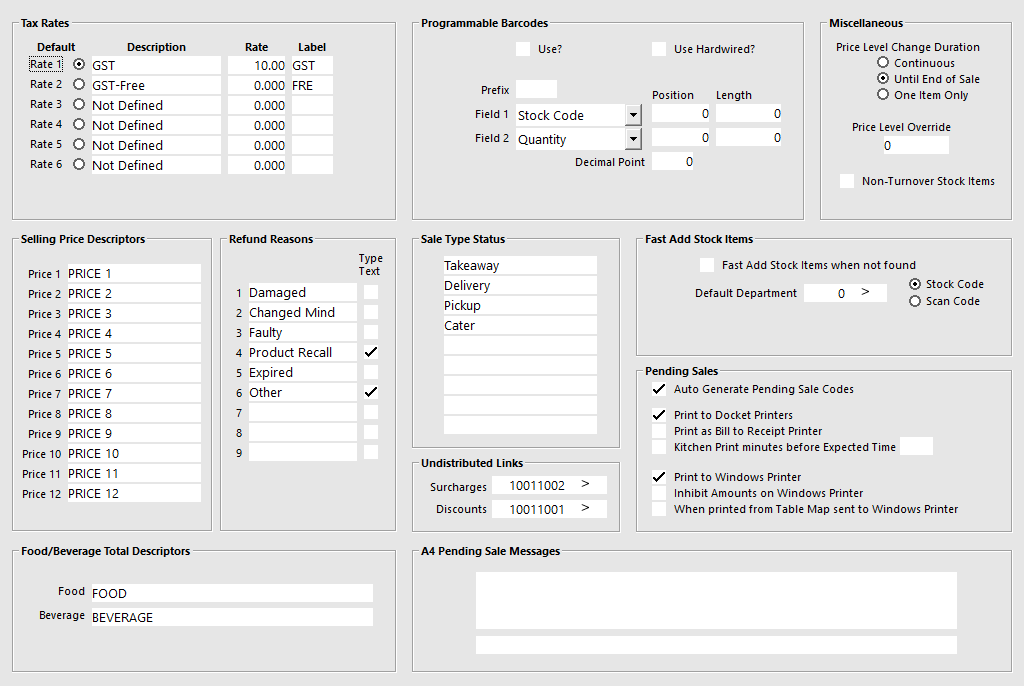
The Sales Tab is broken up into eleven different sections which are:
This area allows you to specify a default tax rate for use, while also allowing other rates to be used.
There are a total of 6 possible rates available.
Select a Default Rate that will be used for all sales.
Enter a Description you want to use (GST), the Rate to be used and the Label.
If the Tax is required to be VAT/Inc, enable the Inc check box.
By enabling the Inc checkbox, any Stock Items that have the corresponding tax rate enabled will have the tax rate included within the sale price of the item (the tax is not added onto the item when tendering the sale).
If the Inc checkbox is not ticked, any Stock Items that have the corresponding tax rate enabled will have the tax rate added onto the item at the end of the sale.
Configure the Inc option as required for your region.
Two additional options are available when configuring a system set to Canada, Saudi Arabia, Singapore, USA or India:
Show Rates next to items on Receipt - When enabled, this option will display the Tax Rate in brackets next to the Stock Item on the receipt.
The example on the left shows a receipt with the "Show Rates next to items on Receipt" enabled, the example on the right shows a receipt with the option disabled:
Combine Rates into One Total on Receipts/Bills - When enabled, this option will combine all tax rates into a single "Tax" total at the bottom of the Receipt/Bill.
The example on the left shows a receipt with the option "Combine Rates into One Total on Receipts/Bills" enabled, the example on the right shows a receipt with the option disabled:
This allows you to rename the descriptions of the different Price Levels for Stock Items.
When modifying a Stock Item (via File > Stock Control > Stock Items > Select a Stock Item > Modify), the descriptions for each Price Level configured in Global Options will be displayed on the Stock Items window:
These fields allow you to set descriptors that allow multiple Sales Categories to be linked to, but reported separately.
Sales Categories are able to be reported on separately but in some instances, you can view the descriptors which will group the figures into the appropriate section.
This will also be the case in various other reports and functions throughout POS.
You can attribute reasons to Refunds for reporting purposes.
You can have up to 9 different reasons with the option to enable "Type Text" for each reason.
When the "Type Text" option is enabled for a reason and that reason is used to perform a refund, the operator will be forced to enter additional details for the item being refunded.
Programmable Barcodes are used in Grocery Stores for products that have been weighed and pre-packed using a Label Printing Scale.
Programmable Barcodes are also outlined in the Ishida Uni 5 Interface topic.
Use? – To enable feature.
Use Hardwired? – Will recognise barcodes as Hardwired Format.
Prefix – All barcodes starting with this prefix will be considered as a programmable barcode.
Field 1 – Choose either Stock Code or Department Code.
Field 2 – Choose either Price or Qty.
Position Fields – Enter the starting position for Field 1 & 2.
Length Fields – Enter the length of the fields for Field 1 & 2.
Decimal Point – Enter the decimal point position when using Price for Field 2.
The barcode number has the following data embedded in the code:
Prefix – Usually 02 or 2
Stock Code or Department Code – Usually 4 to 5 digits
Quantity or Price – Either the quantity or price can be embedded in the barcode, either 4 or 5 digits.
Check Digit – Last digit on the barcode
02 - Prefix
00092 - Stock Item
8 - Check digit
0152 - Price
7 - Check digit
It is possible to have three formats in use at the same time which is Hardwired, Barcode Starting with 2 and Barcode Starting with 02.
Hardwired Format
This barcode will read when the ‘Use Hardwired?’ option is enabled. Hardwired means, the position of length of the barcode is fixed for this type of barcode.
This allows you to set different positions and lengths for the other two types of barcodes.
When Use Hardwired is enabled, it will detect Barcodes starting with 02 and 2 and also have the following starting numbers: 20, 22, 24, 28, and 29.
The example below is a “hardwired” programmable barcode that starts with 28:
If the Barcode starts with a 02:
The position for the stock code is hardwired to position 3 with a length of 5.
The position for the price is hardwired to position 9 for a length of 4 with 2 decimal places.
If the Barcode starts with 2:
The position for the stock code is hardwired to position 3 with a length of 4.
The position for the price is hardwired to position 8 for a length of 5 with 2 decimal places.
Barcode Starting with 2 and 02
Some Scanners add a leading zero to UPC-A Barcodes.
To fix this, you can program the scanner to convert UPC-A barcodes to EAN-13, however this will change EAN 13’s with a leading zero NOT to output the zero character.
Idealpos will still identify barcodes starting with a 2 as a programmable barcode, even though the prefix has been set to 02 in programmable barcodes.
The way it works:
If the length is 12 characters and you have a prefix set as 02, and the first code isn’t 0 and the second code matches the 2 prefix number (2) POS will add a zero to the barcode.
Whilst the barcode does not show a leading zero, when the barcode is scanned, a zero will be added to the number making it a total of 13 digits.
This is the most common type of programmable barcode and contains 13 digits.
These descriptors can be used to categorise your Pending Sales.
When a Pending Sale is saved you have the option of applying one of these labels.
These can be used for take-away stores, or businesses that want to highlight pick-up times and delivery details.
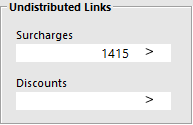
This option is able to be used for two functions and can be used for Surcharges and Discounts.
The Undistributed Link is applied when you are paying an Account on a surcharge tender.
The extra charge needs to be applied to an item in order for the MYOB export to balance up.
First, you need to create a dummy stock item as Surcharge > Create a Sales Category – OTHER.
Create a department – OTHER and link to the Sales Category 7.
Create a stock item and name it as Undistributed Surcharge.
Go to Setup > Global Options > Sales > Undistributed Links > Link the Undistributed Surcharge Link to stock item 1415.

Open an account customer > Ring up items and pay it off by Account tender > You want to pay a payment of the account customer by a tender with Surcharge > Notice that, the surcharge applies during the account payment.
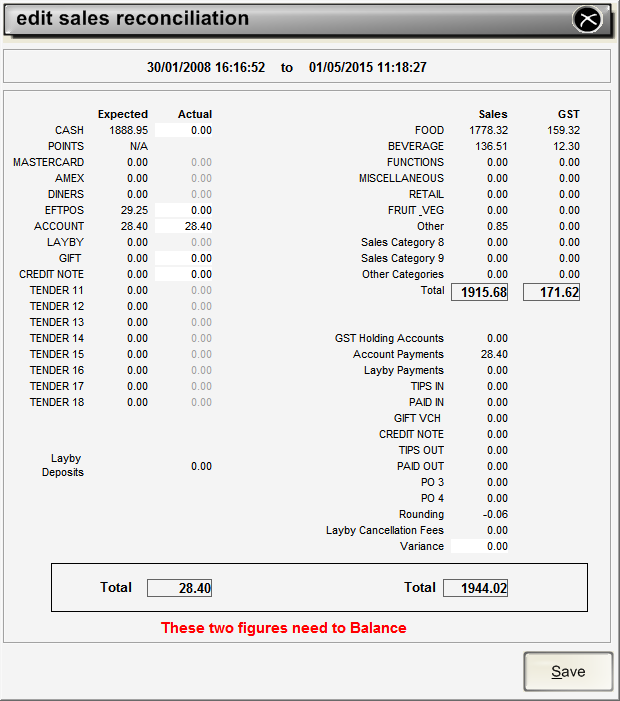
Do an End of Shift > Go to Accounting > End Sales Period > Proceed to end sales > Go to Accounting > Sales Reconciliations > Edit Sales Reconciliations.

The surcharge appears in the Other sales Category > This will be ready to export to MYOB.
In this case, it will balance up with the extra charges to be able to export to MYOB.
When the Price Level has been changed by pressing a POS Screen button assigned to the Price Level function and entering a Price Level, you can specify the duration which the entered Price Level will be applicable.
The options available are Continuous, Until End of Sale and One Item Only.
Continuous – This will continue to charge all subsequent sales and items with the Price Level that was selected.
Until End of Sale – This will keep the price level selected until the end of the current sale.
One Item Only – This will change the price of the next entered item only.
Price Level Override – Enter a number that corresponds with the Price Level that you want to use for all Customer Sales. Note that the Price Level used may differ to the Price Level entered here due to the many levels where a Price Level can be set (e.g. Customer Type Price Level, POS Screen Grid Price Level, POS Terminal Price Level, etc.). Please refer to the Price Level Hierarchy PDF file for further details regarding which Price Level will be used for each case.
Non-Turnover Stock Items – Stock items are able to be linked to non-turnover department & be accounted for as non-turnover sales.
This section is to specify the default department that Stock Items are added to if they are not currently in the database.
Generally, this is used with scanned items that are not currently in the database.
Tick the checkbox to use the feature to fast add stock items when not found.
Default Department – This will be the department the items will be added to. Once they have been added you will be able to manually move them to the department that you want them located.
Stock Code or Scan Code – Select one of these options to decide which field the barcode data will be added to.
For this feature to work properly, you need to ensure “Force Stock Item Search if Item not found” is disabled/unchecked.
Go to Setup > Yes/No Options > POS Screen > Force Stock Item Search if Item not found.
Ensure that this option is disabled/unchecked.
This set of tick boxes controls how printing of Pending Sales is handled.
The options below are available on builds older than Idealpos 7.1 Build 11.
For Idealpos 7.1 Build 11 and onwards, please refer to Pending Sales Options (Idealpos 7.1 Build 11 and newer) further below.
Printed Pending Sales are sent to Receipt Printer - When this option is enabled, any Pending Sales that are printed will also be sent to the Receipt Printer and will be printed in the format of a 'bill'.
In order for this option to take effect, the "Print to Docket Printers" option must be enabled.
Printed Pending Sales are sent to Windows Printer - When this option is enabled and the Yes/No option "Automatically Print to Kitchen" is disabled, a Pending sale that is saved to a Table will be sent to the Windows Printer when selecting the Table from the Table Map and pressing the "Kitchen" button.
Auto Generate Pending Sale Codes - When this option is enabled, Idealpos will automatically generate a Pending Sale Code when creating the Pending Sale
Inhibit Amounts on A4 Windows Prints - When this option is enabled, any amounts such as the Unit Price, Amount and Total Amount will not be printed on A4 Windows Prints of the Pending Sale
Print to Docket Printers - When this option is enabled, Idealpos will send the Pending Sale to the Kitchen printers after the Pending Sale has been saved. Note that in order for this to happen, the Stock Items added to the Pending Sale must also be configured to print to Kitchen Printers.
Print to Windows Printer - When this option is enabled, Idealpos will send the Pending Sale to the Windows printer after the Pending Sale has been saved.
This set of tick boxes controls how printing of Pending Sales is handled.
The below options are applicable to Idealpos 7.1 Build 11 and newer. If you are running an older build of Idealpos, please refer to the options listed above.
Auto Generate Pending Sale Codes - When this option is enabled, Idealpos will automatically generate a Pending Sale Code when creating the Pending Sale
Print to Docket Printers - When this option is enabled, Idealpos will send the Pending Sale to the Kitchen printers after the Pending Sale has been saved. Note that in order for this to happen, the Stock Items added to the Pending Sale must also be configured to print to Kitchen Printers.
Print as Bill to Receipt Printer - When this option is enabled, any Pending Sales that are printed will also be sent to the Receipt Printer and will be printed in the format of a 'bill'. In order for this option to take effect, the "Print to Docket Printers" option must be enabled.
Kitchen Print minutes before Expected Time # - When this option is enabled, the Save Pending Sale window will show a "Send to Kitchen" section with two options to either select "# minutes before Expected Time" or "Immediately". The number of minutes configured here will be pre-filled into the "# minutes before Expected Time" option within Save Pending Sale window. When selecting # minutes before Expected Time on the Pending Sale window, the Kitchen Docket will be printed the number of minutes before the Expected Time. In order for this function to work, you must have "Print to Docket Printers" enabled, Kitchen Printers must be configured/enabled, Idealpos must be running at the time the docket is scheduled to print and the items in the Pending Sale must be configured to print to the Kitchen Printer.
Print to Windows Printer - When this option is enabled, Idealpos will send the Pending Sale to the Windows printer after the Pending Sale has been saved.
Inhibit Amounts on Windows Printer - When this option is enabled, any amounts such as the Unit Price, Amount and Total Amount will not be printed on A4 Windows Prints of the Pending Sale
When printed from Table Map sent to Windows Printer- When this option is enabled and the Yes/No option "Automatically Print to Kitchen" is disabled, a Pending sale that is saved to a Table will be sent to the Windows Printer when selecting the Table from the Table Map and pressing the "Kitchen" button.